
My PGP Keys Live Under My Skin Now

Becoming a cyborg, one applet at a time
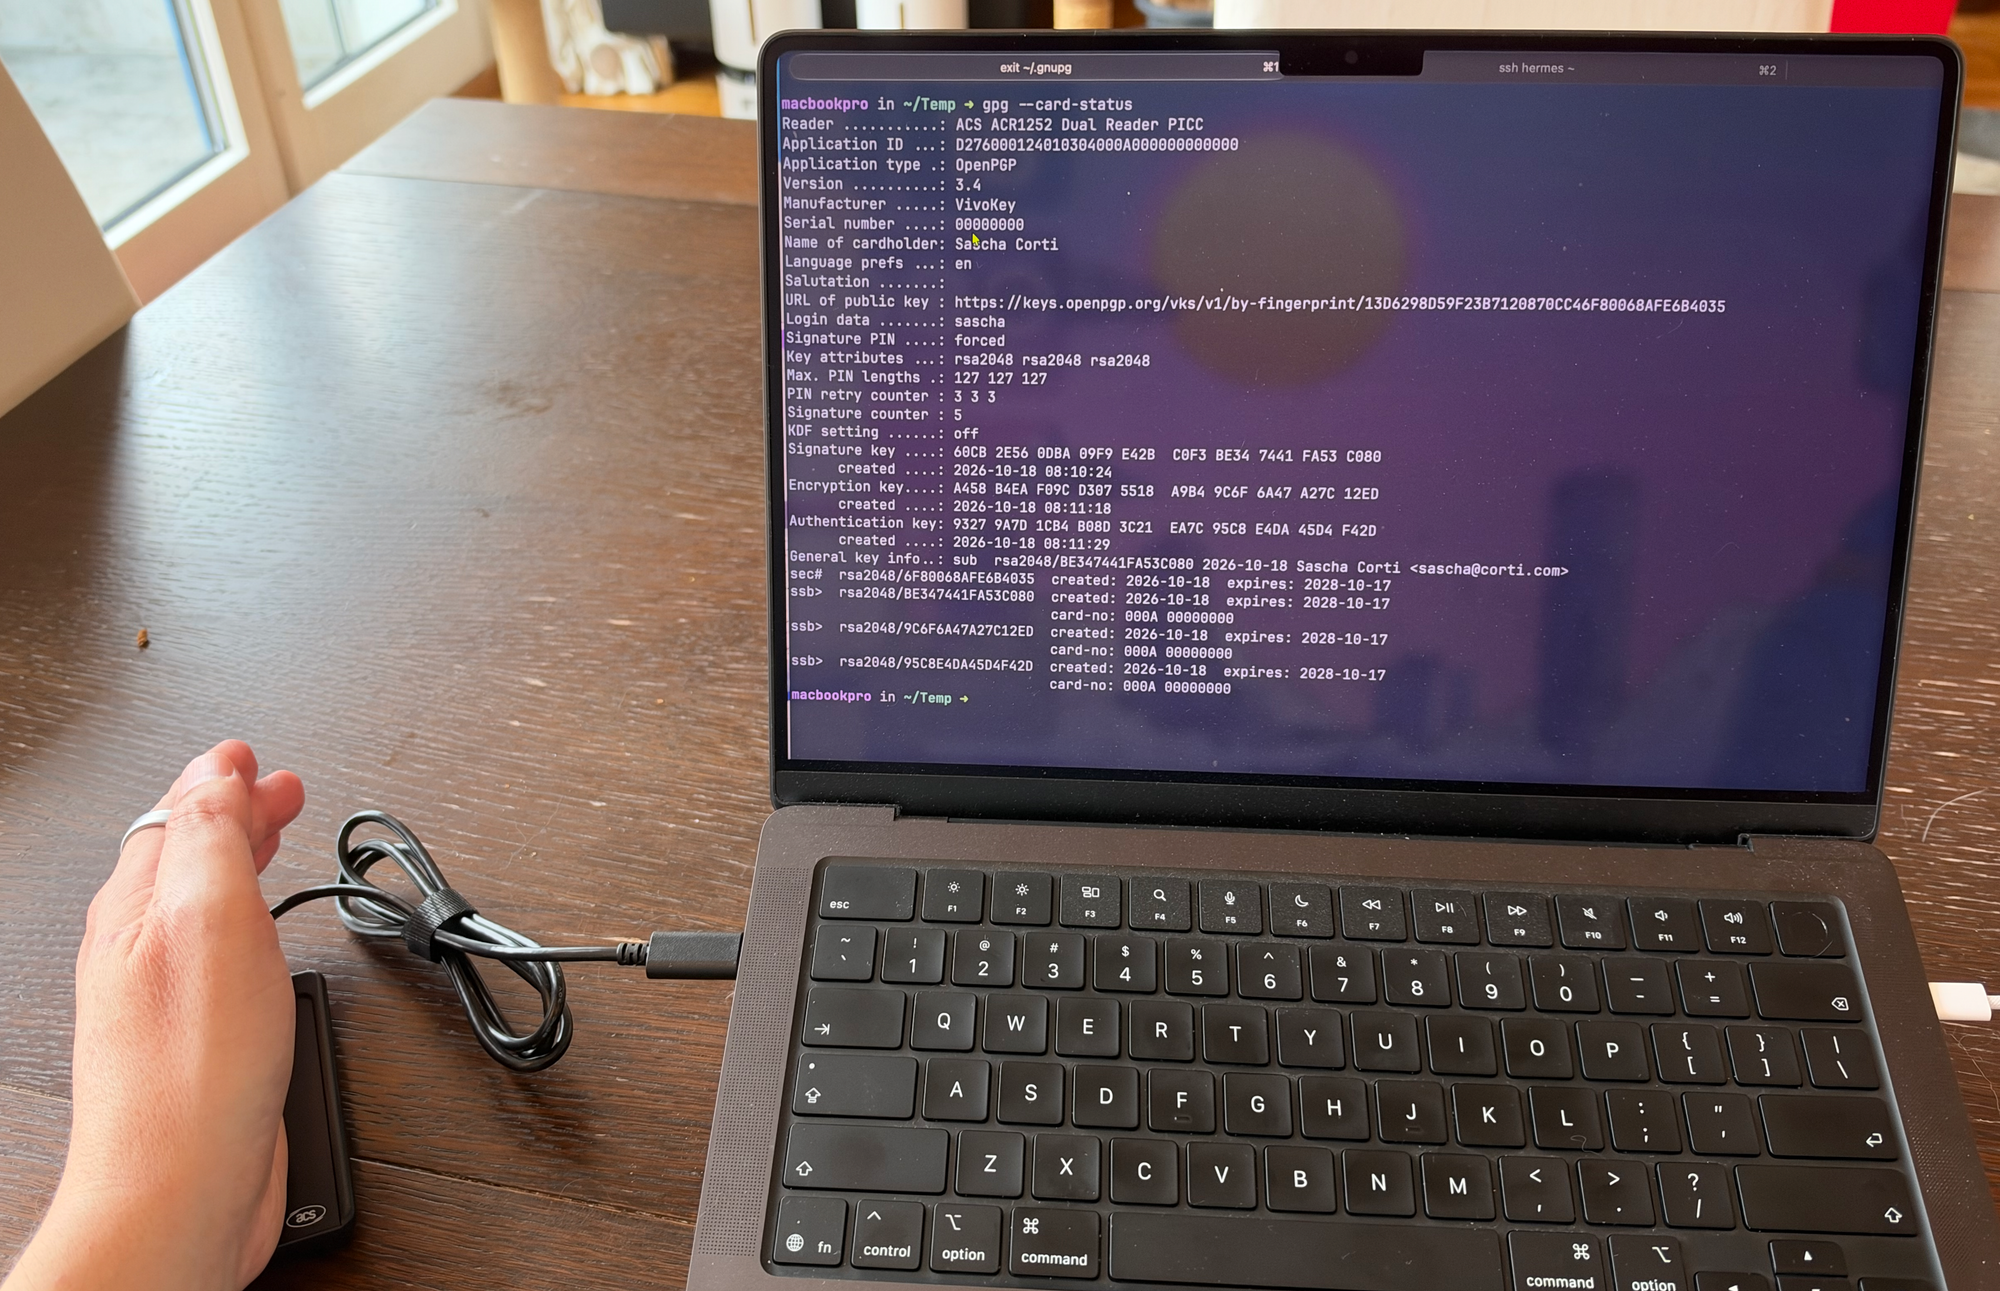
My OpenPGP signing, encryption and authentication keys now live in my hand. They sit on a VivoKey Apex Flex implant, and my MacBook Pro holds only stubs that point to them.
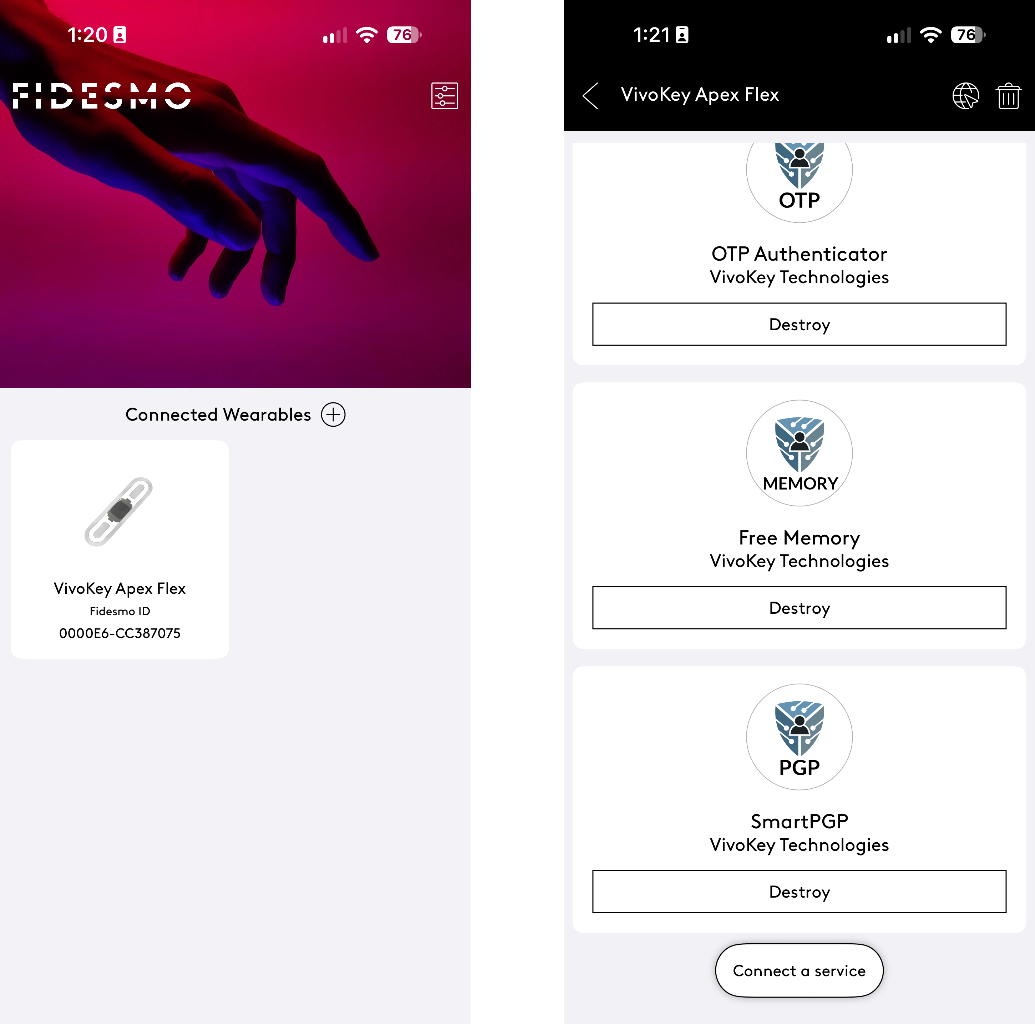
The Apex Flex is a subdermal NFC smart card from VivoKey, sold through Dangerous Things. I installed the VivoKey SmartPGP applet on it with the Fidesmo app. Then I wired it into GnuPG on macOS through a USB NFC reader.
The road there included a reader driver conflict, one blocked Admin PIN and one cryptic pinentry error. This post walks through every step, including the mistakes, so you can skip them.
The stack
Five pieces have to cooperate: the implant, the applet, the deployment channel, the reader and GnuPG.
Layer | What I used | Notes |
|---|---|---|
Implant | Contactless smart card platform, placed under the skin. Payment features are not supported on the Flex. | |
Secure element | NXP P71 | Java Card 3.0.5 at most, per the Dangerous Things forum. This limits the curves available. |
Deployment | Fidesmo app on my phone | VivoKey partners with Fidesmo to deploy applets to Apex devices over NFC. The Apex can only be managed through Fidesmo. |
Applet | VivoKey SmartPGP | VivoKey's fork, Flex-SmartPGP, of the ANSSI SmartPGP Java Card applet. Implements OpenPGP card 3.4. |
Reader | ACS ACR1252 USB NFC reader | Appears as two PC/SC readers: a SAM slot and the contactless PICC interface. |
Host | MacBook Pro, macOS, GnuPG 2.5.24 | gpg, gpg-agent, scdaemon and pinentry do the work. |
A MacBook has no NFC hardware that GnuPG can use, so the USB reader is mandatory. Fidesmo only installs the applet. After that, the implant behaves like any other OpenPGP card.
What SmartPGP on the Apex can and cannot do
The applet supports RSA and NIST or Brainpool curves, but not Ed25519. Check this before you plan your key.
- Algorithms. RSA with a modulus of 2048 bits or more, plus ECC on NIST P-256, P-384, P-521 and brainpoolP256r1, P384r1, P512r1. VivoKey's page advertises RSA up to 4096 bits. Users on the Dangerous Things forum report working RSA 2048, 3072 and 4096 and P-256, P-384 and P-521.
- No Ed25519 or Cv25519. SmartPGP supports Curve25519 only on Java Card 3.1 devices. The P71 in the Apex tops out at Java Card 3.0.5, so an ed25519 key cannot go onto the implant.
- Defaults. User PIN
123456, Admin PIN12345678, no reset code, RSA 2048 in all three slots. Each PIN can be up to 127 characters. - Importing other algorithms. Importing anything other than the default needs the slot switched first with
smartpgp-clifrom the SmartPGP repo, for example./smartpgp-cli switch-p256 -p <ADMIN_PIN>. Changing a slot's algorithm erases the key and certificate in it. - Clients. GnuPG supports OpenPGP card 3.x from version 2.1.16, OpenKeychain on Android from 4.2. SmartPGP's own secure messaging extension works only in OpenKeychain.
I chose RSA 2048. It matches the slots' default, so no smartpgp-cli step was needed for the import.
One detail from the card status is worth knowing. The applet reports serial number 00000000. GnuPG ties on-card key stubs to the card serial, so it cannot tell apart two cards that report the same value.
Getting the Mac to see the implant
The fix was three lines in scdaemon.conf: use macOS's PC/SC stack, open the reader in shared mode, and point scdaemon at the PICC reader. Finding that took four steps.
[embed: node/071434b5-85c2]
With disable-ccid, scdaemon reaches the PICC reader through macOS PC/SC. Its built-in USB driver, which clashed with Apple's driver, stays off.
1. The error
My first gpg --card-status failed:
gpg: selecting card failed: Operation not supported by device
gpg: OpenPGP card not available: Operation not supported by device
The error code behind it is GPG_ERR_ENODEV from scdaemon, in reply to SCD SERIALNO. In plain words, scdaemon found no usable reader or card.
2. macOS sees the reader
system_profiler SPSmartCardsDataType showed the reader and Apple's CCID driver:
Readers:
  #01: ACS ACR1252 Dual Reader SAM (no card present)
  #02: ACS ACR1252 Dual Reader PICC (no card present)
Reader Drivers:
  #01: fr.apdu.ccid.smartcardccid:1.5.1 (/usr/libexec/SmartCardServices/drivers/ifd-ccid.bundle)
Two things matter here. The ACR1252 is two readers, and only PICC is the contactless interface the implant talks to. And "no card present" on PICC meant the implant was not coupled when I ran the command.
3. scdaemon was using the wrong driver
gpg-connect-agent "scd getinfo reader_list" /bye returned:
D 072F:223B:X:0%0A072F:223B:X:0%0AThat vendor:product:serial:interface format comes from GnuPG's built-in CCID driver. 072F is ACS's USB vendor ID. scdaemon was trying to drive the USB device itself, while macOS's own CCID driver already owned it.
The trap: reader_list only reports readers handled by the built-in CCID driver. It never shows PC/SC readers, so it cannot confirm a PC/SC setup. I also made the mistake of pasting this raw D …%0A line into reader-port. It is protocol output, not a reader name.
4. The working config
~/.gnupg/scdaemon.conf:
disable-ccid
pcsc-shared
reader-port "ACS ACR1252 Dual Reader PICC"
Then restart scdaemon, which reads its config only at startup:
gpgconf --kill scdaemondisable-ccidstops the built-in driver, so scdaemon goes through PC/SC like every other macOS smart card client.pcsc-sharedopens the reader in shared mode. macOS runs its own smart card daemon, and exclusive access can fail with a sharing violation. The scdaemon man page warns that scdaemon assumes exclusive access and caches card data, so this line is worth testing without.reader-porttakes the PC/SC name exactly assystem_profilerprints it. scdaemon matches it against the names PC/SC reports.
With the reader held still on my hand, gpg --card-status finally answered:
Reader ...........: ACS ACR1252 Dual Reader PICC
Application ID ...: D276000124010304000A000000000000
Application type .: OpenPGP
Version ..........: 3.4
Manufacturer .....: VivoKey
Serial number ....: 00000000
Signature PIN ....: forced
Key attributes ...: rsa2048 rsa2048 rsa2048
Max. PIN lengths .: 127 127 127
PIN retry counter : 3 0 3
Signature key ....: [none]
Encryption key....: [none]
Authentication key: [none]
Signature PIN: forced means every signature asks for the User PIN. PIN retry counter : 3 0 3 reads as User PIN, reset code and Admin PIN; the 0 means no reset code is set.
Generating the key and moving it into my hand
I generated the key on the Mac rather than on the implant, so I could keep an offline backup. The layout is a certify-only primary key plus three RSA 2048 subkeys, one per card slot.
Generate
gpg --quick-generate-key 'Sascha Corti <sascha@corti.com>' rsa2048 cert 2y
FPR=$(gpg --list-keys --with-colons sascha@corti.com | awk -F: '/^fpr:/ {print $10; exit}')
echo "$FPR"    # must print 40 hex characters

gpg --quick-add-key "$FPR" rsa2048 sign 2y
gpg --quick-add-key "$FPR" rsa2048 encr 2y
gpg --quick-add-key "$FPR" rsa2048 auth 2y
In fish, set the variable with set FPR (…) instead.
My first attempt pasted all of this as one block. --quick-generate-key printed its usage line, so no key was created. $FPR stayed empty, and every --quick-add-key then complained that rsa2048 is not a fingerprint. Typing the commands one at a time worked. If the echo prints nothing, stop there.
Back up before anything touches the card
mkdir -p ~/gpg-backup && cd ~/gpg-backup
gpg --armor --export "$FPR" > public.asc
gpg --armor --export-secret-keys "$FPR" > secret-full.asc
gpg --armor --export-secret-subkeys "$FPR" > secret-subkeys.asc
cp ~/.gnupg/openpgp-revocs.d/"$FPR".rev ./revocation.rev
chmod 600 secret-full.asc secret-subkeys.asc
The exports were created world-readable, hence the chmod. GnuPG writes the revocation certificate automatically at generation time. This folder belongs on offline storage, not in a synced folder.
keytocard
With the reader resting on the implant:
gpg --edit-key "$FPR"
gpg> key 1        # [S] subkey
gpg> keytocard    # (1) Signature key
gpg> key 1        # deselect
gpg> key 2        # [E] subkey
gpg> keytocard    # (2) Encryption key
gpg> key 2
gpg> key 3        # [A] subkey
gpg> keytocard    # (3) Authentication key
gpg> save
Before each keytocard, exactly one ssb line should carry a *. After save, the local subkeys become stubs. gpg --card-status now lists the three slot fingerprints, and the key listing shows where they live:
sec   rsa2048/6F80068AFE6B4035  created: 2026-10-18  expires: 2028-10-17
ssb>  rsa2048/BE347441FA53C080  created: 2026-10-18  expires: 2028-10-17
                                card-no: 000A 00000000
ssb>  rsa2048/9C6F6A47A27C12ED  created: 2026-10-18  expires: 2028-10-17
                                card-no: 000A 00000000
ssb>  rsa2048/95C8E4DA45D4F42D  created: 2026-10-18  expires: 2028-10-17
                                card-no: 000A 00000000
ssb> means the secret part is on a card, and 000A is the manufacturer ID assigned to VivoKey.
Interlude: I blocked my Admin PIN
My first keytocard run ended in "bad PIN" and "PIN blocked". The card was still empty, so a factory reset cost nothing.
keytocard asks for two different secrets in a row. The first is the passphrase of the key on disk. The second is the card's Admin PIN. Three wrong entries at the Admin PIN prompt, for example typing the key passphrase there, block it. The counters afterwards:
PIN retry counter : 2 0 0The last digit is the Admin PIN, at zero. The OpenPGP card spec offers no way to unblock it; the only way back is a factory reset:
gpg --card-edit
gpg/card> admin
gpg/card> factory-reset
After two confirmations, the counters read 3 0 3 again, and the PINs and slots were back to the applet's defaults. If the reset had failed, the fallback is deleting and reinstalling the applet in Fidesmo, which also wipes it.
Before retrying, check that the local subkeys are still intact with gpg -K "$FPR". They should show as ssb, not ssb>. Otherwise, re-import secret-full.asc from the backup.
On the second run I read every pinentry title before typing. "Unlock the OpenPGP secret key" wants the key passphrase. "Admin PIN" wants the card PIN, and the dialog shows the tries left. Once the subkeys are on the card, the same mistake is no longer free: a reset wipes the slots, and the backup is the only way to restore them.
The last hurdle: pinentry
The first real signature failed with an error that has nothing to do with the implant:
$ echo test | gpg --clearsign
gpg: signing failed: Inappropriate ioctl for device
gpg never asks for a PIN itself. It asks gpg-agent, which launches a pinentry program to collect the PIN and has scdaemon pass it to the card. With stdin piped, a terminal pinentry cannot work out which TTY to draw on, and it fails.
There are two fixes:
- Tell the agent your terminal. Put
export GPG_TTY=$(tty)in~/.zshrc, orset -gx GPG_TTY (tty)in fish'sconfig.fish. Then rungpg-connect-agent updatestartuptty /bye. - Use a GUI pinentry. This also covers signing from GUI apps that have no terminal:
brew install pinentry-mac
echo "pinentry-program $(brew --prefix)/bin/pinentry-mac" >> ~/.gnupg/gpg-agent.conf
gpgconf --reload gpg-agent
gpg-agent is a long-running daemon that reads its config at startup. gpgconf --reload gpg-agent makes it re-read pinentry-program without a restart; gpgconf --kill gpg-agent is the blunt alternative, and the next gpg call starts a fresh agent. Do not let pinentry-mac save the PIN in the macOS Keychain. That would undo Signature PIN: forced.
Testing it, layer by layer
- pinentry alone:
echo GETPIN | "$(brew --prefix)/bin/pinentry-mac". A dialog appears; type dummy text, because pinentry echoes it back. - The whole chain: sign and verify a message with the reader on the implant.
echo test | gpg --clearsign > test.asc
gpg --verify test.asc
gpg --card-status | grep 'Signature counter'
The result:
gpg:                using RSA key 60CB2E560DBA09F9E42BC0F3BE347441FA53C080
gpg: Good signature from "Sascha Corti <sascha@corti.com>" [ultimate]
Signature counter : 3
That fingerprint is the [S] subkey in the implant's signature slot. The card counts its signatures, so the counter rises by one with every successful signature. Decryption can be checked the same way with echo secret | gpg -e -r "$FPR" | gpg -d, which uses the [E] key on the card.
Bonus: it works from my iPhone too
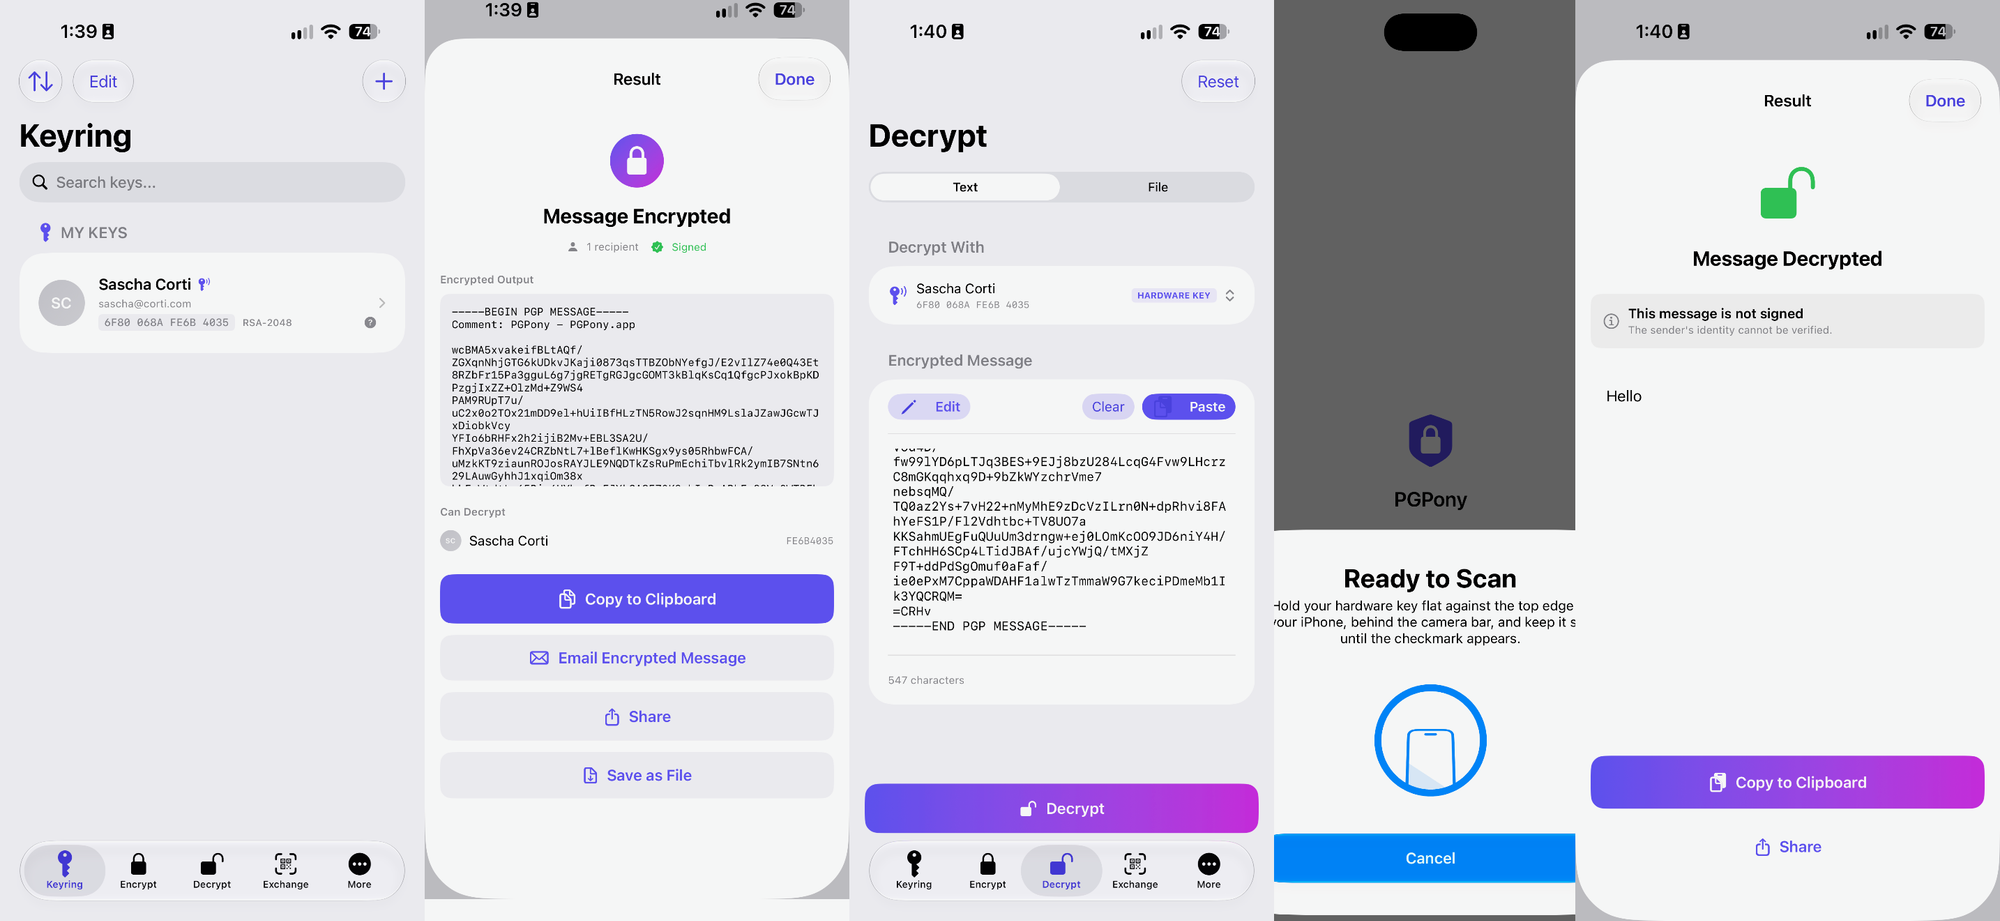
PGPony works flawlessly with the implant on iOS. Its listing names YubiKey and Token2 as tested cards, so I was not sure the VivoKey applet would work. It did.
The setup has two steps:
- Add my public key to the app.
- Link the key to a hardware key. PGPony offers USB-C or NFC; the implant is NFC.
From then on I can encrypt, sign and decrypt in the app. To decrypt, I tap my Apex Flex to the phone, and the [E] subkey on the implant does the work. Encrypting to someone needs only their public key, so it works without the implant.
Hardening checklist
A fresh applet runs on the factory default PINs. Right after the first good signature, I changed both PINs and moved the backup to a USB stick that now lives in a safe. Do the same before you use the card for anything real:
- Change the Admin PIN, then the User PIN:
gpg --card-edit,admin,passwd, options 3 and 1. Store both in a password manager. - Optionally set a reset code (option 4), so a blocked User PIN can be reset without the Admin PIN.
- Move
~/gpg-backupto offline storage and delete it from the Mac. - Remove the primary key from the Mac: find its keygrip with
gpg -K --with-keygrip "$FPR", delete that file from~/.gnupg/private-keys-v1.d/, and confirmgpg -Kshowssec#. - Publish
public.ascand set the card'surlfield, sofetchingpg --card-editcan import the public key on a new machine. - Test whether
pcsc-sharedis needed; drop it if the card still works without it.
Next uses for the same keys:
- Git signing:
git config --global user.signingkey 6F80068AFE6B4035andcommit.gpgsign true; git uses the[S]subkey on the card. - SSH:
enable-ssh-supportingpg-agent.conf,SSH_AUTH_SOCKfromgpgconf --list-dirs agent-ssh-socket, and the public key fromgpg --export-ssh-key "$FPR". The[A]slot then signs SSH logins.
What I learned
An implant is just a contactless OpenPGP card; every problem I hit was on the Mac side, not in my hand.
- Let PC/SC own the reader on macOS.
disable-ccidstops scdaemon from fighting Apple's CCID driver for the USB device. - Dual readers need a pin. The ACR1252 exposes SAM and PICC;
reader-portmust name PICC. getinfo reader_listonly covers the built-in driver. It never lists PC/SC readers, so it is useless for a PC/SC setup.- Coupling is part of every command. "No card present" usually means the reader is not on the implant's sweet spot. Forum users report that a flaky link can make long operations fail, so hold still during
keytocard. - Read pinentry titles. The key passphrase and the Admin PIN are asked back to back, and three wrong Admin PINs force a factory reset.
- Back up before
keytocard. The backup turned my blocked Admin PIN into a minor detour. - Plan the algorithm around the chip. Ed25519 is not available on the Apex's P71; RSA or NIST and Brainpool curves are.
- Run commands one at a time. One failed command made every following one fail with misleading errors.
- Pinentry needs a TTY or a GUI. Set
GPG_TTYor use pinentry-mac.
Sources
- SmartPGP README (ANSSI / github-af): features, defaults, GnuPG and OpenKeychain support, secure messaging
- VivoKey Flex-SmartPGP: VivoKey's fork of the applet
- VivoKey Apex and Apex Flex: applet list, Fidesmo deployment
- Dangerous Things forum: Apex Flex VivoKey SmartPGP issues: algorithm switching, Ed25519 status, NFC reliability
- Dangerous Things forum: ECC import support: P71 and Java Card 3.0.5 limits
- Dangerous Things forum: updates for the Apex and flexSecure applets: reinstalling an applet deletes its keys
- GnuPG T6729: "Operation not supported by device" on macOS, ENODEV
- GPGTools support thread: macOS smart card daemon and shared access
- Werner Koch on gnupg-users and GnuPG T988:
reader_listcovers only the internal CCID driver;reader-portwith PC/SC - scdaemon man page:
disable-ccid,pcsc-shared